Minggu, 16 Oktober 2016

Quarter knees cut fitted

Today I cut out the quarter knees from a piece of mahogany. I used the transom knee from the Glen-L plans as the basis for the shape. However I had to change the corner angle to match.

Using my angle finder, I determined the transom-to-sheer corner angle to be 110°, or a 10° outward rake. (The keel-to-transom rake is 12°). Of course, theory is all fine and good... I drew it, I cut it, I planed it. I still had to re-cut it to fit. Cest la vie.

With another angle-finding tool, I determined that the vertical rake from the transom to the midline of the sheer was about 5°. So, I adjusted my planer/jointer to 5° and planed the edge of the knee that will mate to the transom. Happily, it worked great the first time. 

A little minimal corner-cleaning with a chisel, and everything fit great. Repeat for the other side.

Ive also heard these pieces referred to as "corner knees." Whatever the proper term is, I still need to finish sanding them.


Mahogany port quarter knee
Port quarter knee.

Starboard quarter knee.

This is where Im planing to install the rear cleats.


Read More..

Sometimes its the obvious things

I reserve the right to change my mind.

Yesterday, Id decided to just leave the globs of cured epoxy sandwiched between the chines and stem as-is. They were hard to reach, and it seemed like it was going to take me forever to make any real progress on them. So, I thought Id just write them off as large, malformed, out-of-control fillets. 

That was before I discovered the obvious: 

A chisel is very effective at removing cured bits of epoxy.

Certainly it will do it faster than sandpaper or files, which are of course still needed to smooth the surface. For what its worth, I noticed that the epoxy Id thickened with #2 silica is more brittle and breaks away easier than the epoxy Id thickened with mahogany sawdust.

So, with chisel in hand, I once again attacked the biggest glob of epoxy, which is behind the starboard chine. After making a bit of progress with the chisel, I filed away aggressively with a coarse round file. A little more work, and Ill have it reduced to something more acceptable.

Sure, it will still be a large fillet. But it wont be so malformed and out-of-control.

So with that, Ive made a blog post each day this week. I suppose its a fairly representative week in the slow-but-steady progress Im making on the Utility. God willing, Ill be able to put the little boat in the water this year.
Read More..

Sabtu, 15 Oktober 2016

When I first saw this picture of a double bladed paddle, I thought it was a new Aleut type.  And so I made a copy of it.  As it turned out, it was too short for me and I never used it after its original trial. Later, the photo showed up on some forum and somebody perceptive pointed out that the double bladed paddle looked like it was two single bladed paddles lashed together, possibly after having been sawed to better fit together. Sure enough, if you look carefully, you can see the lashing that made one paddle out of two.  The picture was taken at the Chicago Field Museum when it was the site for the World Fair.
The problem with using a single bladed blade shape for a double-bladed paddle is that the single bladed paddle is designed to be used more or less vertically so that the full blade is immersed in the water at then end of the stroke.  The blade on the double bladed Aleut paddle is widest near the tip so you can get more blade in the water at the beginning of the stroke at a lower blade angle.

Click on the photo for a better view.  Note the single bladed paddle tucked under the improvised double bladed paddle.
Just recently, it occurred to me that the one paddle out of two process could be reversed and if I cut my too short double paddle in half and spliced some more wood to it. Then I could have two usable single bladed paddles instead of just one unusable double bladed paddle.
The double cut in half on a bandsaw. The half on the right already has its extension glued to it. 

And here, a close-up of the sliced portion of the paddle.
Soon as my paddle transformation is complete, I will report on the performance of these paddles.
Read More..

Rabu, 12 Oktober 2016

Google Maps Water Policy

As residents of the Western United States are probably aware, there have been a number of drought years with negative results on both the crops that need irrigation and on recreational users that like to go waterskiing on the states reservoirs.

Just recently we returned from a vacation in Sequoia National Park and on our way out we passed Lake Kaweah, one of the many reservoirs at the edge of the Sierra Nevada mountains.  What we saw at the east end of the lake looking west was this. A mostly dry lake.  The remaining water was mostly near the dam.  The whole reservoir looked like it was at no more than 20 percent capacity.

Back home, I went on google maps to see what amount of water was actually left.  Surprisingly, on google maps, the lake looked 100 percent full.
In a way, it made sense for the map makers to fill the lake with virtual water since on maps, the convention is to show lakes up to design capacity.  So it also make sense to make the pictures match the maps. But on zooming in, I also found that while map makers wanted to show water where it was supposed to be and not where it actually was they did at the same time have a desire to show the latest road data.

And here it is, real roads under virtual water.  The deal is, if people are going to be able to launch their boats, youre going to have to build roads up to the edge of where the water actually is, that is several tens of feet below the surface of the virtual lake.
So map makers past fake water on top of the dry lake bed.

Curiously, in this particular case,  the surface of the virtual water had a cool vortex right in the middle of one of the bays.
I was intrigued and curious if Google followed the same policy of topping off reservoirs with virtual water all around the state of California.  I moved over to San Luis Reservoir just west of Los Banos.  This reservoir was also way down the last time I drove by it. 

The long view again showed a lake topped off to the brim.

But the closeups showed an un-doctored view, bathtub rings showing previous lake levels and trees growing on former lake bottom.
Research on this topic is continuing.
Read More..

Selasa, 11 Oktober 2016

Laminating the front seat More painting

I decided to start working on the forward thwart. Both thwarts are cut from 22/32" AC exterior-grade plywood. My plan is to laminate 1/4" Meranti plywood onto the top, so that the seats will match the deck and the transom.


My original plan was to stain the sides of the lighter-colored AC plywood. However, Ive changed my mind & now plan to paint the sides Sea Foam Green to match the accent color on the sheers.

The forward thwart is 12" long x 45" wide at the base. (The sides are bevelled, so the top is wider than the bottom). Luckily, I had a piece of Meranti large enough to use, so I dont yet have to cut into one of the remaining sheets.

I cut out the middle section of it, arranging it so that it will have an attractive grain pattern showing on the top of the seat.

Grain pattern for the forward thwart.

Then I turned it over and coated it with epoxy. I coated the mating surface of the AC plywood thwart with epoxy, and stuck them together. Since the whole thing was laying flat, with flat mating surfaces, I did not use thickened epoxy. I weighted the thwart down with concrete blocks and a paint can to get good adhesion.

I set the whole thing on waxed paper to avoid accidentally gluing it to my working surface.

With the remaining epoxy from the batch, I added a 2nd layer to encapsulate the aft section of the boat. I got the port side done before I ran out of epoxy. Once it cured, it was ready for paint.

Half of the aft section with 2 layers of epoxy.

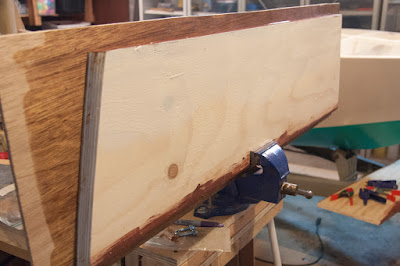
Once the epoxy on the thwart cured, I put the whole assembly in my bench vise for further work.

First layer of Whidbey White painted in the aft section.

Cleat removed from the port quarter knee; quarter knee taped off, and more paint applied to the back.


A light frosting of paint on the underside of the thwart.


A third coat of Whidbey White on everything but the transom.


Read More..

Just In Time Upcycling

In the old days, like back as far as the 60s people used to re-use stuff.  Then along came re-cycling which was not the same as re-use.  Re-cycling meant grinding stuff up and then using it as feed stock for something brand-new.  Old stuff was passe. New stuff was hip.  Recycling was something that hippies did.  Re-use was something your mom or your grandmother did. That is, your mom didnt throw away your old clothes but patched them up or made them last a while longer by maybe altering them or embroidering on them or turning old stuff into quilts, or your dad would take bent nails and pound on them with a hammer till they were straight again and could have another life. 
And then, stuff became so cheap that re-use became too quaint for any reasonable person to countenance.  Re-use became more expensive if you counted your time than simply throwing stuff away and buying new.  That was in the days when people had jobs.
But now that jobs are going extinct, more and more people dont have jobs and all of a sudden, re-use isnt such a stupid proposition.  But re-use isnt a cool name for what we are doing and instead it has been re-branded as up-cycling. Whatever. 
It is what it is and little by little, more and more people are tapping into the recycling and waste stream and extracting materials from it that once upon a time were practically worthless.  Instead of grinding everything down to pulp and then squirting it out of some machine to make new stuff, more and more people are taking the practically worthless stuff and using it as is or modifying it just a little to fit their own use.  Nothing new, really, but as more and more people do this, the stuff that used to be worthless will become more and more precious.  With nobody having jobs and the money to buy the new stuff made from old stuff, the old stuff as is without being recycled will become more expensive.
So this is where the concept of just-in-time upcycling comes in.  You have to grab stuff out of the waste stream and modify it to suit you while you can, before everyone else realizes that this is where its at and makes the stuff that is now being thrown away into an expensive commodity.
Check out Wendy Tremayne and The Good Life in my next post for more on this topic.

Read More..

Senin, 10 Oktober 2016

Planking completed


The planking is now completed. In a manner of speaking, the structural work on the hull is basically done. However, there is a lot of work still to be done before the fiberglass goes on.

I had just barely enough epoxy left to finish the job. I used System Three Silvertip, which I thickened with #2 silica, as the last of my mahogany sawdust was gone. I was also running low on 1” silicon bronze screws. However, I did have plenty of 1-1/4” screws. So, I snipped the ends off of enough of them to finish the job, and they worked just fine.

Now its time for a lot of sanding.
Read More..