Sabtu, 19 Maret 2016

Old Kayak Old Paint Part 2

For the premise of this post, go back one post.  This post is about yet another instance of a paint job gone wrong.  Not functionally wrong, just esthetically wrong, though not entirely, not in my estimation anyway.
 I took these pictures just before repainting the hull of my favorite Unangan kayak, (baidarka).  The reason I was repainting was not that the finish looked spotty. I actually liked the look, sort of organic, but rather that there was wear in the base coat that was letting water leak in.
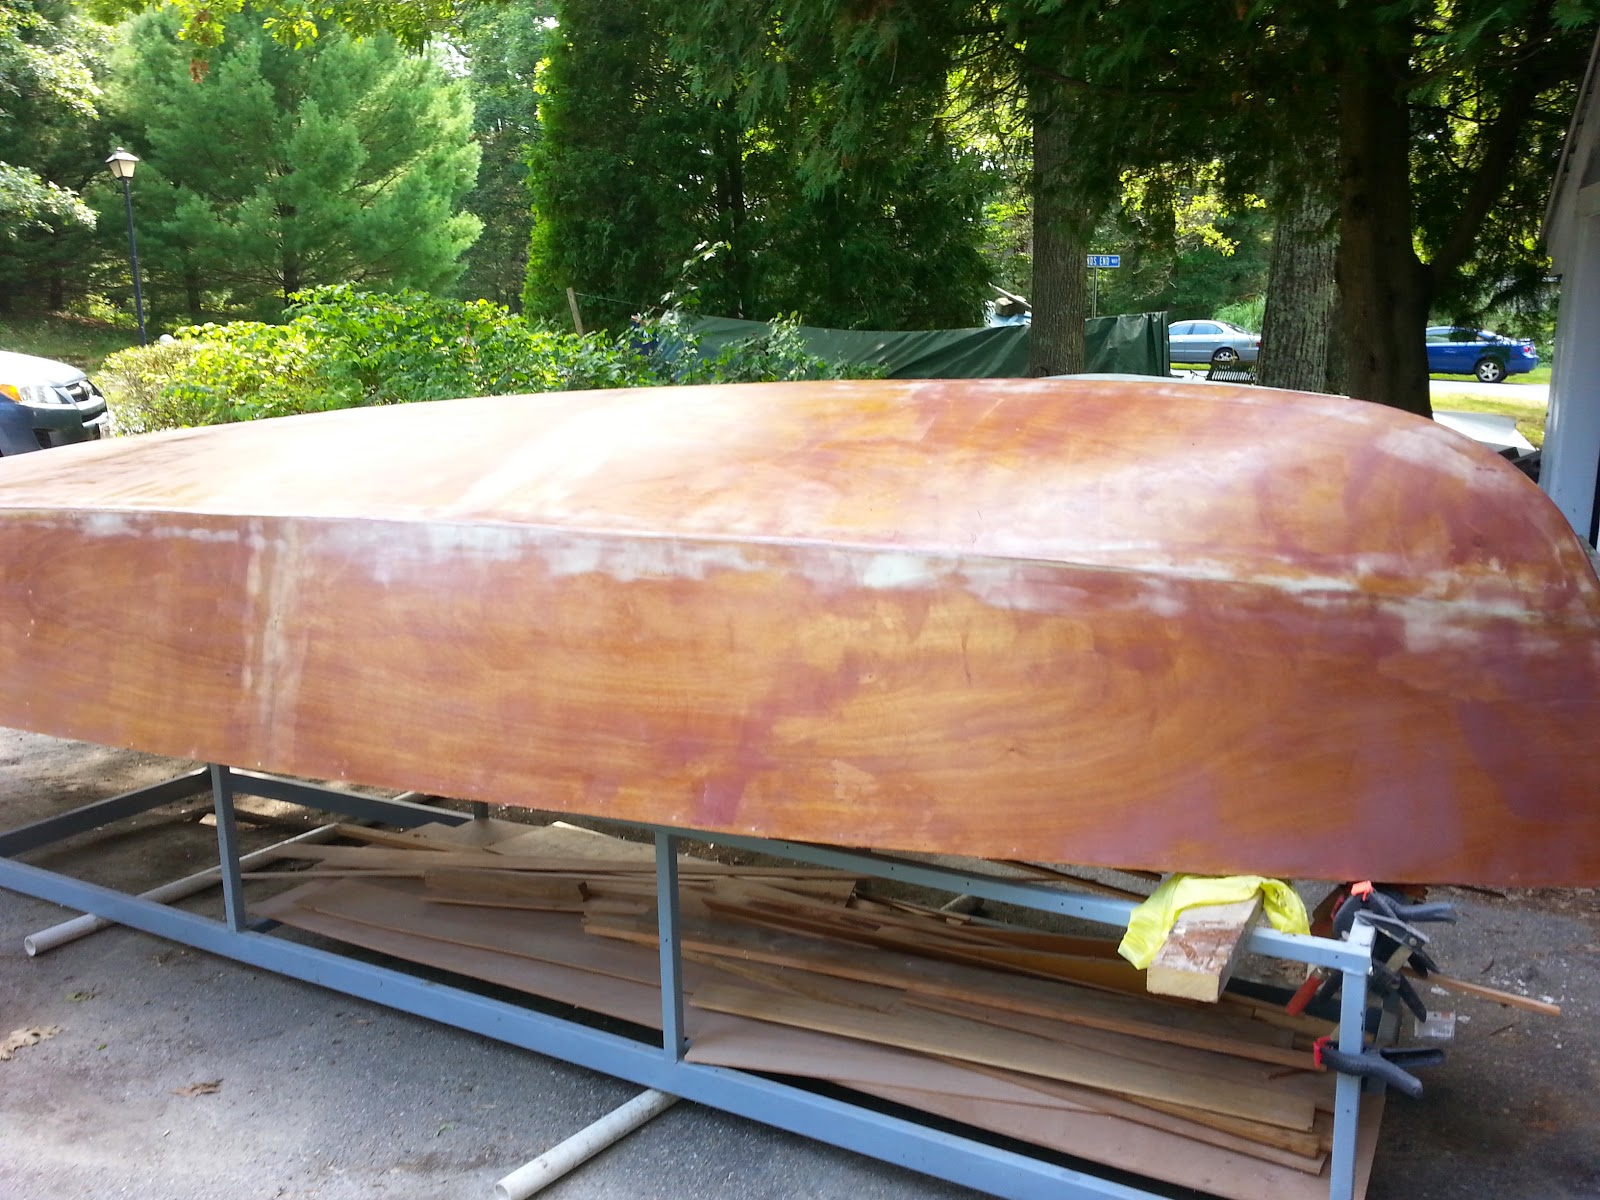
The original sealer on this boat was varnish which gives the boat a vaguely rawhide colored look.  But I wanted something darker like rawhide thats sat in a museum for 200 years.  I was able to achieve that look, or so I thought until I questioned other people what it looked like and they said it looked like tree bark.  What I had done was mix oil color with varnish and I painted that over the original varnish coat. 
If I had read the label on the varnish I would have found out that once the varnish is fully cured, you need to sand it before you try to paint over it.  As you might guess, I just painted without sanding and so after about a year or so the new paint turned brittle and on exposure to sun started flaking off a little at a time.  As I said, I liked the look - kind of like lichen on a rock or a seal with the mange, but I finally had to throw in the towel on this paint job and scraped and sanded and then covered it over with a coat of gray latex paint.
Read More..

Kamis, 17 Maret 2016

Wood and Canvas Canoe Restoration Impending

I am about to launch into another wood and canvas canoe restoration, assuming the owner is willing to spend the money.  A new one of these kinds of canoes is about $4000, so anything less than $2000 for a restoration is probably a good deal.  Perhaps you would pay more if the boat was an heirloom and you have some emotional connection with it.
This boat looks like a good candidate.  The hull is in fairly good shape. It needs some varnish stripping, some new planking, new skin, paint, interior varnish, outwales, gunwale caps, thwarts and seat restoration and seat hardware. And after all that was replaced or fixed, the boat would once again look spiffy. And of course it would have that old-timey wood, paint and brass, handmade look.


The canoe minus its canvas skin.  Planking is white cedar over white cedar ribs.


A view of the top of the canoe, partially decked in mahogany.

Interior view showing ribs and assortment of rotted wood trim. 

Closeup on the rotted trim.  The curved piece at the top left is one of the exterior stems.


Read More..

Goose Story


The geese are starting to hatch out back of the shop. A few days ago while riding my bicyle home, I ran into this family of geese, mother, father and eight goslings on the other side of a cyclone fence that keeps people away from the water.  I stopped, intending to take a picture of the happy family but realized that I had forgotten my camera. I had to settle for just looking at them.  As I got closer to them, the father got into his protective role, lowered his head and hissed at me.  And then I noticed, off to the left, at a safe distance from the protective father, a crow, watching for straggler goslings and the chance of a meal. 
Coincidentally, three crows had showed up at the shop just a few weeks earlier, no doubt just in time to take advantage of the impending gosling season.
A few more days went by and a visiting friend told me of a crow with a broken wing that he had seen on the way in to the shop.  Ah, crow with a broken wing.  No doubt some unfortunate accident, but then it occurred to me that the crow might have gotten a little too bold and run afoul (afowl) of the father goose who had possibly broken his wing.  We cant know for sure, but for sure I got some pictures two days ago of all eight goslings still waddling and swimming about with their protective parents flanking them.
Read More..

Rabu, 16 Maret 2016

A Few Good Reads

Im making slow but steady progress fairing the boat frame. Ill have a more detailed post on that topic before long.

In the meantime, Ive been reading quite a lot. I just finished reading two other boatbuilding blogs and a forum thread start-to-finish, as well as a new book by Daniel James Brown titled The Boys In The Boat.

For the new boat builder, I highly recommend reading boatbuilding blogs, as they give fantastic firsthand insights from other amateur builders. I hope that my own blog here will be of some help to other builders, just as other blogs have been very helpful to me. Here are links to the blogs & thread that I recently finished reading:

1. Bobs Boat Build. (Building a 16 Glen-L Malahini Runabout)
http://bobsboatbuild.blogspot.com/

2. Chris Glen-L Zip Build. (Building a 144" Glen-L Zip Runabout)
http://www.vupilot.blogspot.com/

3. Robertas ZIP. (Forum thread on building a 144" Glen-L Zip Runabout). Outstanding craftsmanship, resulting in one of the finest Zips ever put in the water. Truly inspiring.
https://glen-l.com/phpBB2/viewtopic.php?f=17&t=10702

4. The book I just finished is The Boys In The Boat — Nine Americans and Their Epic Quest for Gold at the 1936 Berlin Olympics. Its a superbly-written true story, and probably the best book Ive read since that summer in college when I read Margaret Mitchells Gone With The Wind. Many thanks to Wooden Boat Magazine for the e-mail notification on this one!
http://www.woodenboatstore.com/product/books_The_Boys_in_the_Boat/rowing_crew

Finally, heres a link to a must-read blog, (particularly if youre going to build a Glen-L Squirt):

Arts Boat Build http://artatkinson.blogspot.com/

Art built the most beautiful Squirt Ive seen. Im proud to say that I had the privilege of riding in this boat at the 2012 Glen-L Gathering. If you are considering a Squirt, but are concerned about the small size of it, I can say that the design is FAR more stable than I would have thought in such a small craft. The very first thing I thought to myself when I sat in his boat, "Work of Art," was: "Why didnt I finish building one of these?" The Squirt is a fantastic design, limited only by its two-person capacity.

Taking a ride in Arts Squirt, "Work of Art." September 2012.


Read More..

Kamis, 10 Maret 2016

Two More Coats of Whidbey White

Ill just let the pictures tell the story...


Here you can see the flattened area & secondary indentations on the bow to accommodate the bow eye. The hull has also been lightly sanded with 220 grit in preparation for the 3rd coat of paint.

Hull lightly sanded in preparation for the 3rd coat of paint.

Hull lightly sanded in preparation for the 3rd coat of paint.

After two more coats of Whidbey White, I pulled off the tape and newspaper.

I had to do a little touch-up painting along the edges of the transom. There are several more spots that need some touch-up paint.

Sea Foam Green, Whidbey White, and bright-finished Meranti.

Ink from the newspaper left ugly stains on the paint. So far, I havent been able to clean them off. I may simply paint another coat over it. Obviously, I wouldnt recommend using newspaper for this sort of thing.


Fitting the bow eye.

Read More..

Rabu, 09 Maret 2016

Fairing and keel

August 15th, 2014

I am finally closing in on the final stages of hull finish prep.  The third coat of epoxy just about filled the weave, and then the boat gets a quick sanding (three hours) to remove the globs, and just a fraction of the remaining bumps from the glass.  Next,  a fill with fairing compound, hand sand with the long board, then fill and fair until I get sick of it.  The keel will be installed afterwards as well as the centerboard gasket, then primer on the hull prior to turning.  The goal is to get the boat back upright and the majority of the interior finished prior to the weather window closing in at the end of October.

6 oz glass set in 3 coats of epoxy that have been squeegeed on.  
August 21, 2014
got the first coat of fairing compound (WEST 407) on it today.  It takes about three hours to apply a thin coat all around.  Shame is, I gotta sand most of it off to find the low spots.  Sundays project.  Hopefully painting by Labor Day.

August 26, 2014
8 hours of sanding later...I would highly recommend a thicker coating of fairing compound.  Too late now.  Just order more microballoon filler.  Arms hurt, ears, hurt, much sandpaper, Sanding sucks.  Oh...the bottom is ready for primer and the keel.

Sides tomorrow.


Read More..

Senin, 07 Maret 2016

So that didnt go quite as planned

Tilting the rear thwart upward so that epoxy would run into the gap between the 2 pieces of plywood seemed like a good idea. The only problem was, after the epoxy cured, the gap remained.

The effort wasnt without merit, however. Several different parts did get encapsulated with another coating of epoxy. Still, the gap needed to be filled.

This time, I placed the rear thwart vertically in my bench vise. I drizzled epoxy into the gap until there was no question that it had been filled.

Now the gap has been filled.
I also put another coat of epoxy on the top of the forward thwart, and squeegied it meticulously. And, I brushed a second coat of epoxy onto the underside of the sheers at the back of the boat.

2nd layer of epoxy on the top of the front seat.

Sheers taped off for epoxy & painting.

Sheers taped off for epoxy & painting.

Forward thwart placed back into position.

Marking the position for the forward thwart prior to installing it permanently.
Now, the forward thwart is ready for installation. The rear thwart is ready to be trimmed, and the sheers are ready for primer.
Read More..