Rabu, 09 Maret 2016

Fairing and keel

August 15th, 2014

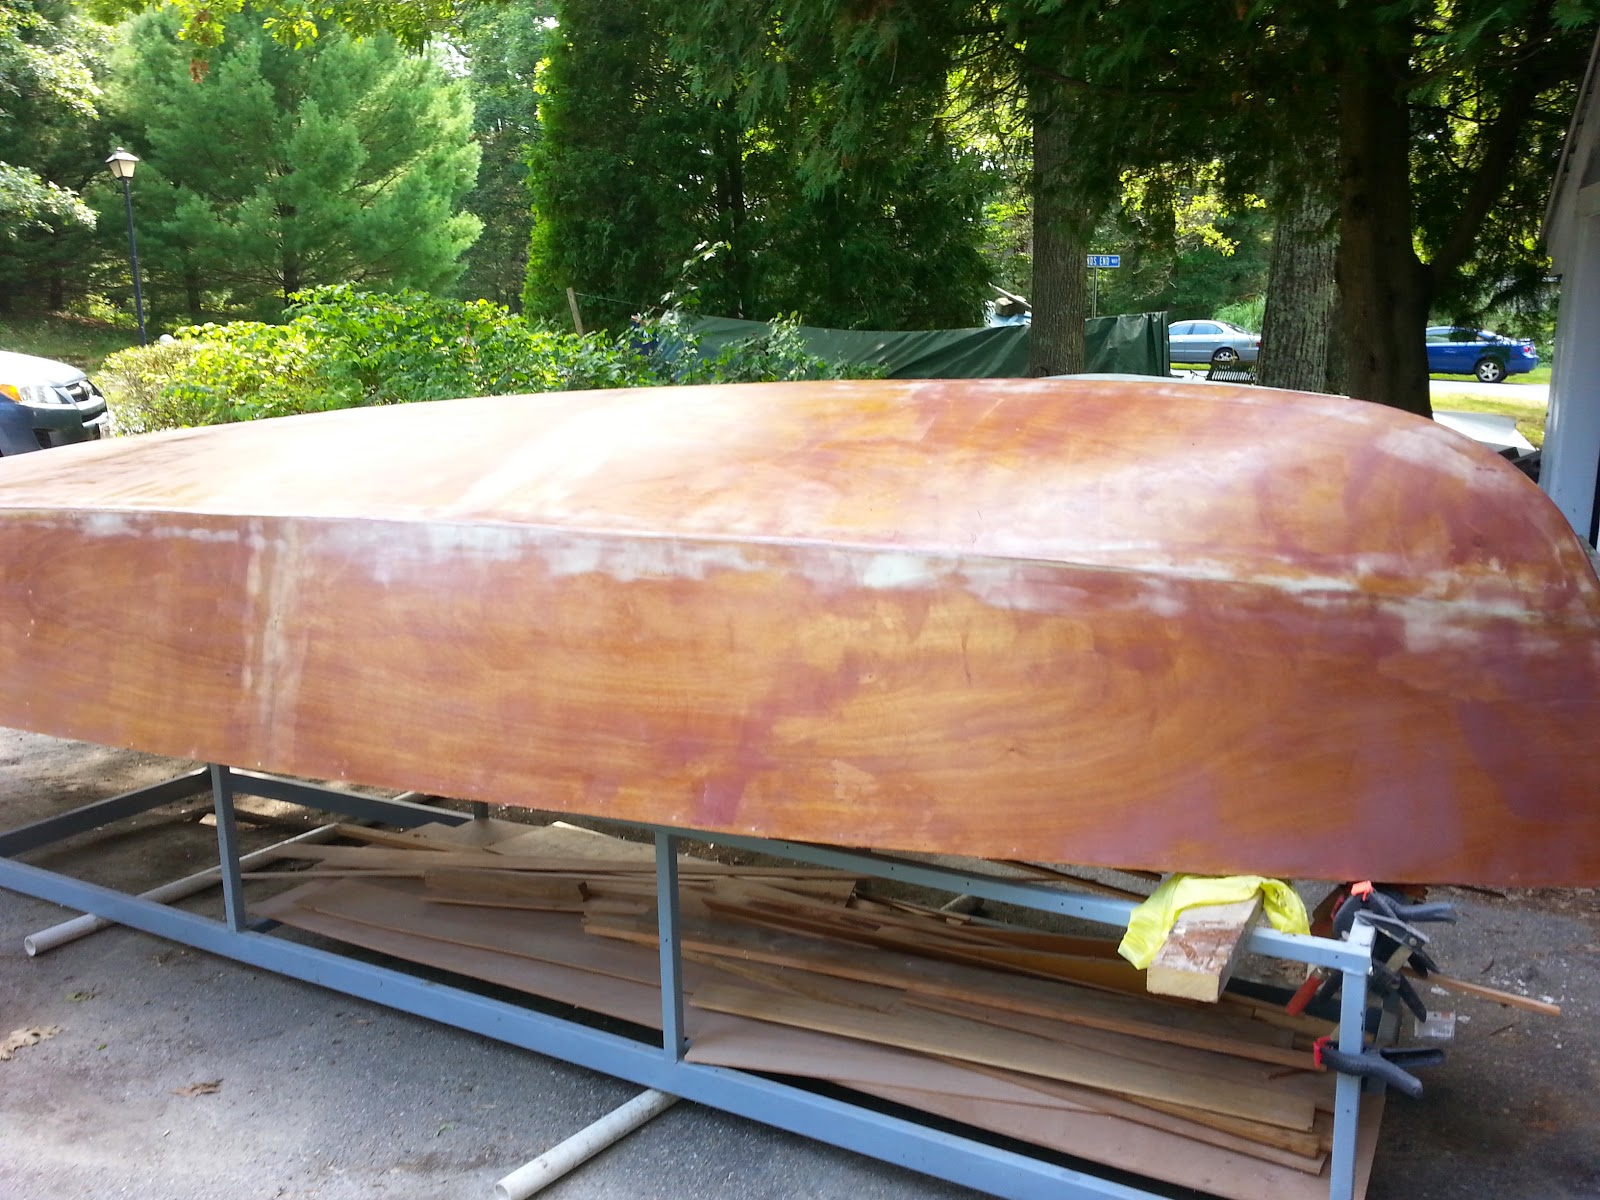
I am finally closing in on the final stages of hull finish prep.  The third coat of epoxy just about filled the weave, and then the boat gets a quick sanding (three hours) to remove the globs, and just a fraction of the remaining bumps from the glass.  Next,  a fill with fairing compound, hand sand with the long board, then fill and fair until I get sick of it.  The keel will be installed afterwards as well as the centerboard gasket, then primer on the hull prior to turning.  The goal is to get the boat back upright and the majority of the interior finished prior to the weather window closing in at the end of October.

6 oz glass set in 3 coats of epoxy that have been squeegeed on.  
August 21, 2014
got the first coat of fairing compound (WEST 407) on it today.  It takes about three hours to apply a thin coat all around.  Shame is, I gotta sand most of it off to find the low spots.  Sundays project.  Hopefully painting by Labor Day.

August 26, 2014
8 hours of sanding later...I would highly recommend a thicker coating of fairing compound.  Too late now.  Just order more microballoon filler.  Arms hurt, ears, hurt, much sandpaper, Sanding sucks.  Oh...the bottom is ready for primer and the keel.

Sides tomorrow.


Read More..

Senin, 07 Maret 2016

So that didnt go quite as planned

Tilting the rear thwart upward so that epoxy would run into the gap between the 2 pieces of plywood seemed like a good idea. The only problem was, after the epoxy cured, the gap remained.

The effort wasnt without merit, however. Several different parts did get encapsulated with another coating of epoxy. Still, the gap needed to be filled.

This time, I placed the rear thwart vertically in my bench vise. I drizzled epoxy into the gap until there was no question that it had been filled.

Now the gap has been filled.
I also put another coat of epoxy on the top of the forward thwart, and squeegied it meticulously. And, I brushed a second coat of epoxy onto the underside of the sheers at the back of the boat.

2nd layer of epoxy on the top of the front seat.

Sheers taped off for epoxy & painting.

Sheers taped off for epoxy & painting.

Forward thwart placed back into position.

Marking the position for the forward thwart prior to installing it permanently.
Now, the forward thwart is ready for installation. The rear thwart is ready to be trimmed, and the sheers are ready for primer.
Read More..

Minggu, 06 Maret 2016

Why not King Island

After I built my first King Island style kayak a few years ago, I realized that it had quite a few good features and would no doubt be a good boat for kayak replicators to build.  However, the boat did not have any kind of reputation and people werent building too many of the King Island or for that matter, any other of the Bering sea kayaks. I was going to write something about this at the time but didnt. Then I got a call from Dave Wilhelm who makes King Island kayaks and we talked about how this kayak type is under-appreciated.  You can read about Daves appraisal of the virtues of this kayak by following the link. Meanwhile, I will give you my theory of why some kayaks are more appreciated than others.
The reason is really quite simple.  The Unangan kayak, or baidarka has a larger following than most of the Bering Sea kayaks because George Dysons book, Baidarka did a lot to propagandize it.  George provides a lot of quotes from explorers who when first encountering these kayaks were impressed by their excellent performance.
Nobody has done this kind of promotion for the other kinds of Alaskan kayaks. David Zimmerly published the book Qajaq which shows plans for a number of Alaskan kayaks and he also did a book on the Hooper Bay kayak but unlike George Dyson, Zimmerly never did the kind of sales job that George Dyson did.  And so, these boats remain underappreciated.
But some of the lack of Bering Sea kayak replication is also practical.  Bering Sea kayaks are large volume kayaks made for carrying up to 900 pounds of gear.  Most recreational kayakers do not need this kind of cargo capacity and the extra volume makes for a slower boat than one built to be paddled empty.  Of course, the Bering Sea designs can be scaled down for recreational use, something that few people have done although Dave Wilhelm has moved in that direction and Skip Snaith and Sean Gallagher have as well and their efforts will no doubt popularize the type and put more of them out on the water.
Read More..

Sabtu, 05 Maret 2016

I finally did it. Finished the EA kayak with some deviations from the traditional norm, painted it and headed out to the water to see how it paddled.
There it is by the side of the water.  Launch imminent as soon as I get in and start paddling.  Weight is between 50 and 60 pounds Im guessing.  Length is just short of 18 feet about 16 of which are in the water. Beam is somewhere around 27 inches. Two paddles are resting on the boat.  One Greenland style, 88 inches long and the other, an Aleut style with a 3 inch wide blade at 120 inches long, yes, thats right, ten feet long.
The big question was what sort of speed a flat bottomed boat could be paddled.
I had my GPS with me.  At the start of the test while I was still fresh, I managed to get the boat up to 5.6 mph. Cruising speed seemed to be between 3 and 4 mph. I did my usual two mile circuit once around Ballena Island. Wind was variable, maybe up to 15 mph and wind blown waves were about 1 foot max.  So not much of a rough weather test.
Overall, the boat seems to move about adequately.  Turning with the flat bottom is easy.  The boat responds quickly.  I thought that staying on track might be a problem but it turned out not to be.  The boat had no particular tendency to turn into or out of the wind and it had adequate length so it wasnt yawing right and left with each stroke.  Paddling both down and upwind was possible without any undue steering effort required. So all in all, the boat performed well.  I would still like to take it out on a rough day when waves are more like two feet, like a normal summer afternoon on the bay.
I ended up using the 120 inch paddle for most of the trip since it seemed to be a better match to the boat than the 88 inch paddle which required more effort to reach the water.
Overall, I felt that I needed more experience with the boat.  The initial outing left me feeling that its weight and speed was such that I need to discover some more positive attributes for the boat or it would not get much use. 
Speed is of course an ill defined measure.  What matters is efficiency.  Overall, the width and flat bottom of the boat are a combination that require a good deal more effort to make the boat go than just about any other kayak style that I have built.  If I were to build another version of this boat, I would probably decrease overall width and increase flare to the sides from the 10 degree flare that I put into this model. Increased flare would decrease the width of the bottom. I probably would also go with bent ribs to reduce weight of the boat and have some V in the bottom.  With lighter weight and less resistance  to movement this style of boat would be adequate for recreational use.
As I mentioned earlier, the boat also needs some rough water testing to see how the flat bottom handles going over waves.

Read More..

Jumat, 04 Maret 2016

G9 minus seven


Seven days until G9.

Its also September 11. 

Like so many other Americans on the east coast, I will never forget the beautiful, crystal-clear, cobalt blue sky that morning. Such a beautiful morning, and cooler than it was today.

Boats.

Okay, todays progress is that I painted more. I got the 2nd coat onto the section I painted yesterday, with one exception: I still need to paint the undersides of the deck framing, sheers, and breasthook. 

I also painted the aft face of Frame #2.


With the 2nd coat on, the color is starting to look much better.

I decided to get the Forest Green fenders. They dont quite match the Sea Foam Green bottom paint, but they do look better than the Teal fenders, which were simply too blue. I didnt want to get white, because I felt theyd blend in too much with the boat. I wanted complimentary colors & a little contrast. I suppose I couldve gone with black, to match the outboard motor... but I didnt.

I also decided to color-code my ropes: Forest Green fender lines to match the fenders, and braided Gold & White dock lines.

Read More..

Kamis, 03 Maret 2016

Eastern Arctic Kayaks Hudson Strait

Heres a bunch of pictures of Hudson Strait kayaks.  They came to me by way of Bill Samson, I believe.  They are labeled something like Burwell1, Burwell2. Wikipedia has some info on Burwell Here.
These kayaks are among the longest kayaks ever made.  Why they were made the way they were made is probably a matter of evolution in response to local conditions.
This photo is called, "going ashore at Port Burwell."  Looks like plenty of ice in winter.  Apparently kayaking here was a summer activity.
Caption: "Port Burwell, 1919." Looks like a sheltered Fjord suitable for the paddling of flat bottomed kayaks.
Wow, look at that nose.  Overhang on these things was up to 4 feet.  So if the boat was 22 foot long, length on the water was more like 18 feet.  The long overhang appears to have about as much function as fins on a Cadillac, but I suspect that it actually is a useful way to get a flat bottomed boat over a wave without undue pounding. Also note the long paddle.  Looks to be about ten feet long with narrow blades, 3 inches max, maybe less.
One more time a little more from the side.
And here they are racing.  The paddlers are generating a good deal of froth like they would at the starting line.  Note the paddler farthest right with his high angle of attack on his paddle.  For normal cruising, the paddles were supposedly held much lower down, even balanced on the foredeck to spare the paddlers arms.

Read More..

Rabu, 02 Maret 2016

scarfing the panels

Looking forward to working in the downstairs workshop.  I put a wide sawhorse under the panels being joined, put down a layer of plastic, and then primed with a coat of epoxy, then followed that with a slightly thickened batch of epoxy with silica added.  A piece of mahogany weighed down with paint cans and water bottles will hold the panels while the epoxy sets up.


Outside in the garage, I finished laying out the forward bottom panel.  Will cut tomorrow and splice into the other bottom panels.  Scarf will be 2" for an 8:1 scarf.  Pretty simple.  tough part will be cleaning the garage to make the second scarf joint.  


When I took this off the "press" both corners did not seat well.  It took a few minutes with a belt sander and then a follow up with a little fairing compound to get a nice smooth filet.  Front side was fine.  Back side a little messy.  On the second attempt, I clamped the mahogany board down on each end and already see an improvement.  Nothing a little filler cant fix.   The second panel yielded the same results.  I believe that my mahogany clamp is not flexible enough to get good pressure on the edges.  


Forward panel is scribed and ready to cut.  

Read More..